- PROVIDED FOR REVIEW -
Showing posts with label nail vinyls. Show all posts
04 April 2015
Easter Nail Art: Chevron Chicks
Labels:
black,
chevron,
easter,
i scream nails,
kbshimmer,
nail art,
nail vinyls,
orange,
spring,
whats up nails,
white,
yellow
14 March 2015
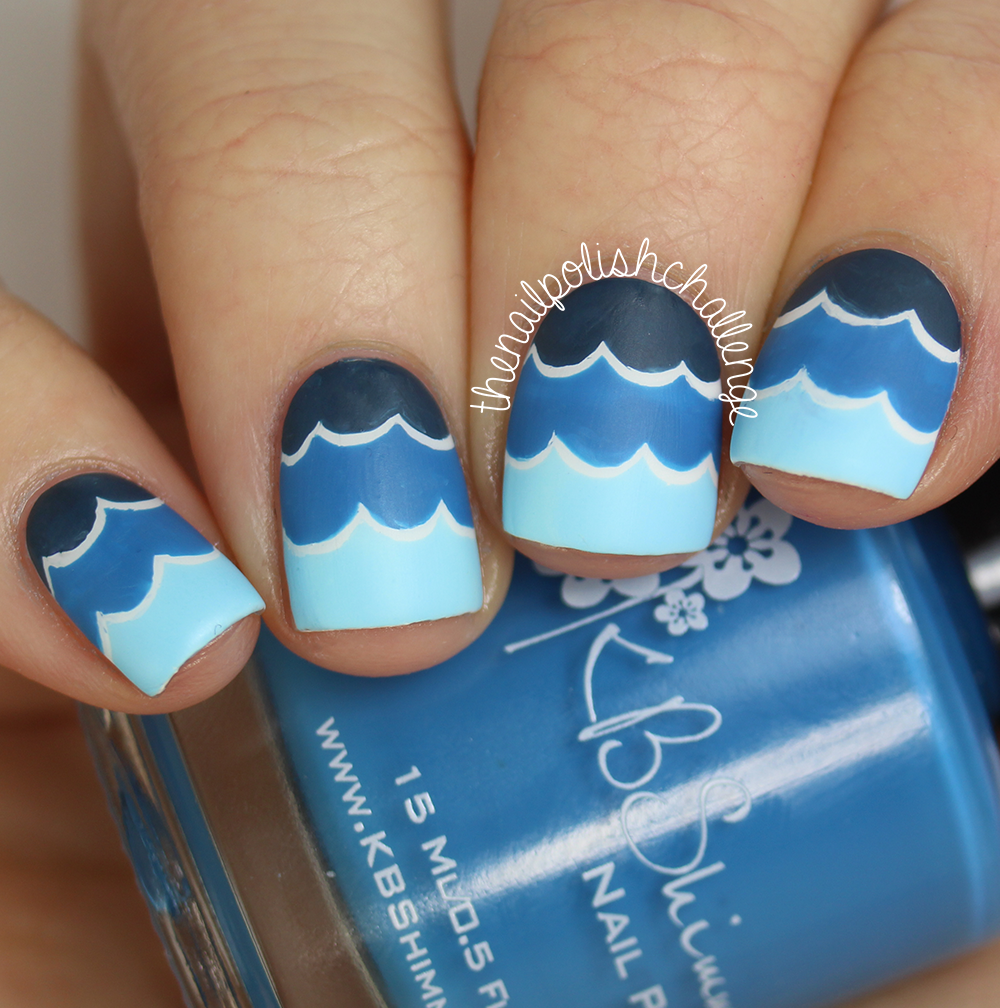
Ocean Wave Nail Art With KBShimmer Nail Vinyl Decals
Hi guys! I did this nail art a while ago and I have been so excited to share it with you guys, but my computer has been running so slowly that it took me forever to edit! The weather has finally been getting warmer here in NJ, so I figured I would celebrate with some bright and fun ocean nails, using my KBShimmer scalloped nail vinyl decals.
11 February 2015
The Digit-al Dozen Does Patterns on Patterns: Hearts on Stripes
Hello, everyone! I hope you are enjoying the Digit-al Dozen
week so far! I know I am, but I have a bunch of fun swatches to share with you
too, so I’m getting a bit eager for the week to end. Anyway, I’ve got another
Valentine’s Day look to share with you today (I know I keep saying that, and
all my manicures are really just regular manicures in pink and red, but this
one is themed – I promise! It even has hearts in it.) I actually consider this
one to be a bit of a fail, because the freehanded hearts are far from perfect,
but I think a part of the challenge is to keep up and post every day, even if
you aren’t 100% satisfied with your work.
28 December 2014
China Glaze Neon Swatch Spam and Nail Art
Hi guys! I hope you all enjoyed the holidays this past week - I took a couple days off from blogging to spend time with loved ones, but I'm back in action today with swatches and nail art using some China Glaze neon polishes from Live Love Polish. I've been pretty obsessed with gradients lately, and triangle cutouts, so I figured I'd combine them for today's nail art look:
I started with a base of Cuccio Verona Lace, a white creme, to make the neon colors pop. Once that was dry I sponged on a gradient of China Glaze Yellow Polka Dot Bikini, China Glaze Son of A Peach, and China Glaze Pink Voltage, all from Live Love Polish. Once that was dry, I applied triangle nail vinyls from Vinyl Boutique and painted on Cirque Memento Mori before peeling off the vinyls.. I finished everything off with matte top coat.
Even though this style is nothing new, I have to say, I am digging the gradient with black! I did wait a long time for the gradient to dry before using the vinyls, though, since there were several layers of nail polish - I believe I waited about an hour - and I think I probably should have waited a little bit longer so I could get cleaner lines, but I am still satisfied with the result.
And I know, this totally isn't seasonally appropriate, but I decided to just run with it! I do love seasonal nail polishes, but I don't think our nails necessarily NEED to be defined by the weather. And hey, it's summer in Australia, right? ;)
Here are swatches of the polishes I used:
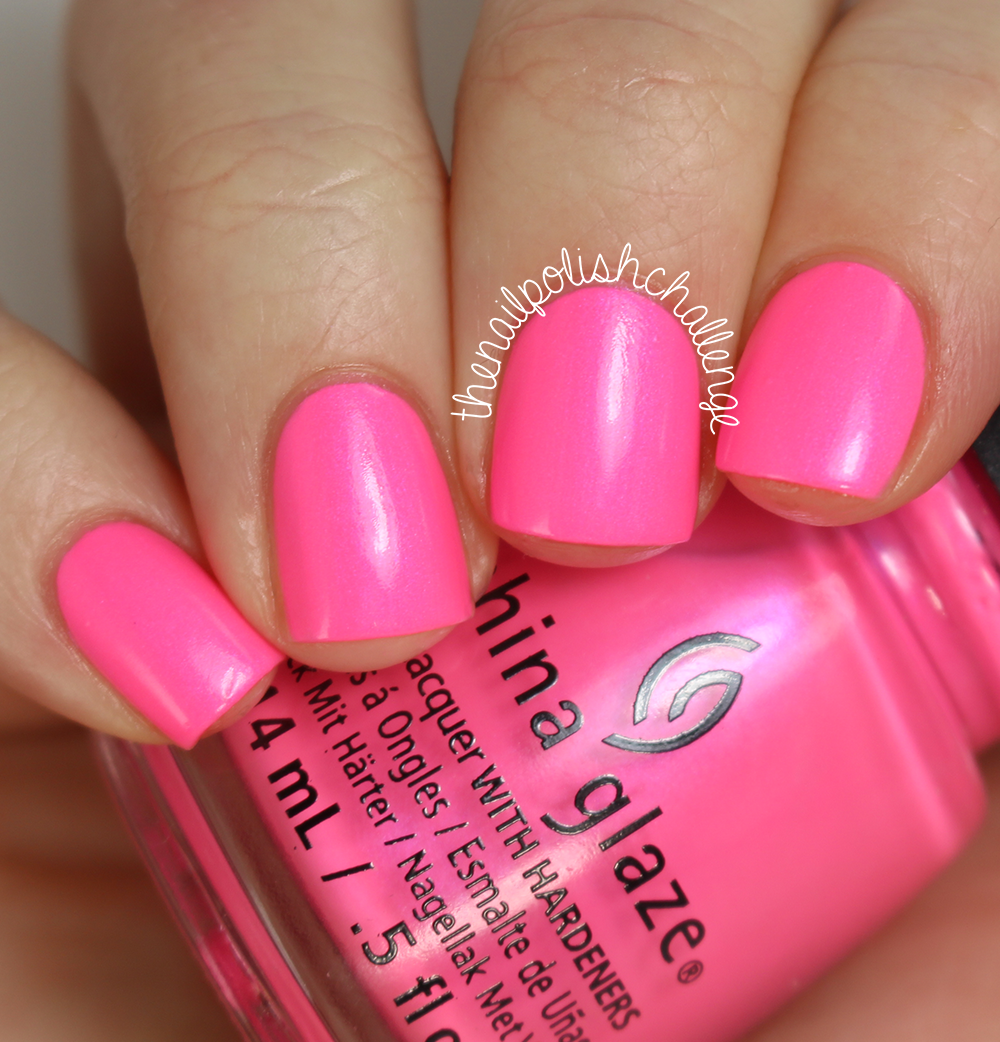
Pink Voltage is a neon pink with a cool toned shimmer throughout. As is usual for neons, this one dried to a slightly matte finish, but I loved how easy it was to apply! Not chalky or difficult at all. Shown above is two easy coats with top coat.
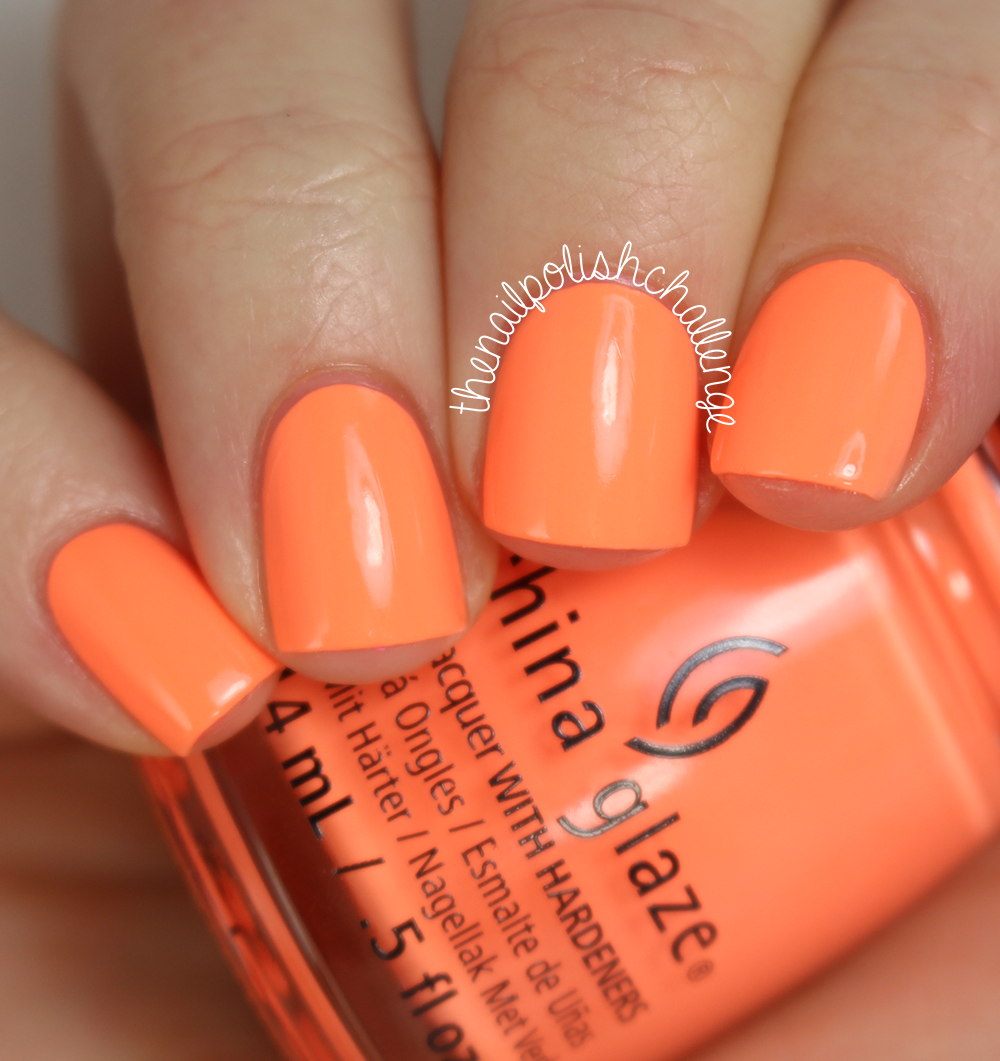
Son of a Peach is a neon peachy orange creme. It is slightly peachier and brighter than in the photo above, but of course, my camera doesn't like neons! Formula on this one was surprisingly thin, but easy enough to use, and again, it dried to a slightly matte finish. I'm glad I finally got my hands on this popular color, because it's absolutely gorgeous. Shown above is three coats with top coat.
And finally, we have Yellow Polka Dot Bikini. Yes, it is that bright! Think "tennis ball" color, only more eye searing! This polish on it's own was too sheer to build to full opacity, so I layered two coats over white for the photo above, along with top coat to shine up the slightly matte finish. Are your eyes burning yet? Haha! This color is perfect for the summer, or if you need to brighten up dull winter days.
The China Glaze polishes are available from Live Love Polish for $7.50 USD each, and you can use the code "INEEDMORENAILPOLISH" at checkout for 10% off your entire order. The triangle nail vinyls are available from the Vinyl Boutique for $5 USD for a sheet of 100.
What do you think of this nail art look? Do you own any of these polishes?
Some products provided for my honest review.
I started with a base of Cuccio Verona Lace, a white creme, to make the neon colors pop. Once that was dry I sponged on a gradient of China Glaze Yellow Polka Dot Bikini, China Glaze Son of A Peach, and China Glaze Pink Voltage, all from Live Love Polish. Once that was dry, I applied triangle nail vinyls from Vinyl Boutique and painted on Cirque Memento Mori before peeling off the vinyls.. I finished everything off with matte top coat.
Even though this style is nothing new, I have to say, I am digging the gradient with black! I did wait a long time for the gradient to dry before using the vinyls, though, since there were several layers of nail polish - I believe I waited about an hour - and I think I probably should have waited a little bit longer so I could get cleaner lines, but I am still satisfied with the result.
And I know, this totally isn't seasonally appropriate, but I decided to just run with it! I do love seasonal nail polishes, but I don't think our nails necessarily NEED to be defined by the weather. And hey, it's summer in Australia, right? ;)
Here are swatches of the polishes I used:
Pink Voltage is a neon pink with a cool toned shimmer throughout. As is usual for neons, this one dried to a slightly matte finish, but I loved how easy it was to apply! Not chalky or difficult at all. Shown above is two easy coats with top coat.
Son of a Peach is a neon peachy orange creme. It is slightly peachier and brighter than in the photo above, but of course, my camera doesn't like neons! Formula on this one was surprisingly thin, but easy enough to use, and again, it dried to a slightly matte finish. I'm glad I finally got my hands on this popular color, because it's absolutely gorgeous. Shown above is three coats with top coat.
And finally, we have Yellow Polka Dot Bikini. Yes, it is that bright! Think "tennis ball" color, only more eye searing! This polish on it's own was too sheer to build to full opacity, so I layered two coats over white for the photo above, along with top coat to shine up the slightly matte finish. Are your eyes burning yet? Haha! This color is perfect for the summer, or if you need to brighten up dull winter days.
The China Glaze polishes are available from Live Love Polish for $7.50 USD each, and you can use the code "INEEDMORENAILPOLISH" at checkout for 10% off your entire order. The triangle nail vinyls are available from the Vinyl Boutique for $5 USD for a sheet of 100.
What do you think of this nail art look? Do you own any of these polishes?
Some products provided for my honest review.
Labels:
black,
china glaze,
live love polish,
nail art,
nail vinyls,
neon,
orange,
peach,
pink,
vinyl boutique,
yellow
14 December 2014
31 Day Nail Art Challenge 2.0, Day 13: Geometric
See, I told you guys I wasn't giving up on the challenge! Today is Day 13 which means geometric nails - another daunting task for a blogger like me, who loves simple nail art! Luckily, I just got in the mail some incredible new nail vinyls from Vinyl Boutique, so I decided to use those for today's manicure:
To achieve this look, I started with a base of Cirque Carpe Diem on my middle two nails (yes, I am obsessed with this flawless white creme - and yes, I've been using it nonstop!), and painted on Essie Strut Your Stuff and Essie Sittin' Pretty on my outer two nails. I stuck on a nail vinyl on my two middle nails once the base color was dry, sponged on a gradient using the same two polishes, and peeled it off to reveal this awesome design! I topped everything off with matte top coat.
I absolutely love how crisp the lines turned out using these vinyls. I probably could have benefited from using another coat of the gradient before I peeled the vinyls off - the polishes I chose were so sheer! Even so, I love how they look and I think these two colors compliment each other perfectly.
I think it's safe to say that I am obsessed with combining soft purples with blues - but who isn't?! I especially love the color that formed where the gradient overlaps.
A bit about the nail vinyls - here is what the sheet looks like. Each nail vinyl sheet from the Vinyl Boutique ranges from $3-$6 USD, and contains ten "strips" for you to apply. But for many of you, you'll find that each strip is big enough for two nails! You don't have to peel off the inside cuts like I did above (I just did that for the photo!), if you start to peel off the vinyl, the inside cuts will stay on the sheet so you are just left with the design.
I found that these vinyls were super easy to use and they left crisp, neat lines. Some vinyls I have worked with require waiting a very long time for your base color to try (even waiting until the next day to apply the vinyls, to keep your polish from peeling up with them!) but these were relatively quick. I believe I waited about 20-30 minutes before using the strips, and they worked perfectly.
For anyone who is interested in learning more about this process, I made a short video on my Instagram page on how to use these vinyls.
Here are the polishes I used. The Cirque polish is available here, and the Essies are from HB Beauty Bar (get 15% off your order with the code POLISHCHALLENGE at checkout!)
The nail vinyls I used are available as a set of ten here for $6 USD.
What do you guys think of Day 13's manicure? Make sure you see what Lindsey and Meghan are up to today as well!
Some products provided for my honest review.
To achieve this look, I started with a base of Cirque Carpe Diem on my middle two nails (yes, I am obsessed with this flawless white creme - and yes, I've been using it nonstop!), and painted on Essie Strut Your Stuff and Essie Sittin' Pretty on my outer two nails. I stuck on a nail vinyl on my two middle nails once the base color was dry, sponged on a gradient using the same two polishes, and peeled it off to reveal this awesome design! I topped everything off with matte top coat.
I absolutely love how crisp the lines turned out using these vinyls. I probably could have benefited from using another coat of the gradient before I peeled the vinyls off - the polishes I chose were so sheer! Even so, I love how they look and I think these two colors compliment each other perfectly.
I think it's safe to say that I am obsessed with combining soft purples with blues - but who isn't?! I especially love the color that formed where the gradient overlaps.
A bit about the nail vinyls - here is what the sheet looks like. Each nail vinyl sheet from the Vinyl Boutique ranges from $3-$6 USD, and contains ten "strips" for you to apply. But for many of you, you'll find that each strip is big enough for two nails! You don't have to peel off the inside cuts like I did above (I just did that for the photo!), if you start to peel off the vinyl, the inside cuts will stay on the sheet so you are just left with the design.
I found that these vinyls were super easy to use and they left crisp, neat lines. Some vinyls I have worked with require waiting a very long time for your base color to try (even waiting until the next day to apply the vinyls, to keep your polish from peeling up with them!) but these were relatively quick. I believe I waited about 20-30 minutes before using the strips, and they worked perfectly.
For anyone who is interested in learning more about this process, I made a short video on my Instagram page on how to use these vinyls.
Here are the polishes I used. The Cirque polish is available here, and the Essies are from HB Beauty Bar (get 15% off your order with the code POLISHCHALLENGE at checkout!)
The nail vinyls I used are available as a set of ten here for $6 USD.
What do you guys think of Day 13's manicure? Make sure you see what Lindsey and Meghan are up to today as well!
Some products provided for my honest review.
29 September 2014
31 Day Nail Art Challenge 2.0, Day 9: Stripes
Hi guys! Wow, we are already almost a third finished with the 31 Day Nail Art Challenge 2.0, and I'm pleasantly surprised. Last year doing the challenge, I was feeling overwhelmed even though I only participated twice a week. This year, I'm pretty confident in my timing, and I think although I am doing mostly simple work, I am coming out with some of my favorite manicures already. I can't wait to see what else this challenge has in store for me. Anyway, today is stripes, so I decided to go with some of my new Essie Fall 2014 polishes (which as you all know, I am pretty obsessed with).
To achieve this look, I started with Essie Find Me an Oasis, which is a super light, almost-white blue. Then, I used nail vinyl decals from KBShimmer to tape off lines, and paint on Essie Fall in Line and Essie The Perfect Cover Up. Then, I peeled off the tape, fixed up the edges with a striper brush, and topped everything with top coat.
I'm a little disappointed with the rough lines here, and I think it would have ended up being neater if I just used striping tape. For whatever reason, I struggle a lot with nail vinyl decals. They just don't work that well for me! Does anyone have any tips?
Even though the lines are choppy, I do love the colors I chose for this manicure and I love the cool toned scheme. It feels very fall appropriate!
Here are all the polishes I used. They are all from HB Beauty Bar - you can use the code POLISHCHALLENGE for 15% off your entire order from them.
What do you think of today's challenge manicure? Don't forget to check out the InLinkz below to see what Meghan and Lindsey come up with!
To achieve this look, I started with Essie Find Me an Oasis, which is a super light, almost-white blue. Then, I used nail vinyl decals from KBShimmer to tape off lines, and paint on Essie Fall in Line and Essie The Perfect Cover Up. Then, I peeled off the tape, fixed up the edges with a striper brush, and topped everything with top coat.
I'm a little disappointed with the rough lines here, and I think it would have ended up being neater if I just used striping tape. For whatever reason, I struggle a lot with nail vinyl decals. They just don't work that well for me! Does anyone have any tips?
Even though the lines are choppy, I do love the colors I chose for this manicure and I love the cool toned scheme. It feels very fall appropriate!
Here are all the polishes I used. They are all from HB Beauty Bar - you can use the code POLISHCHALLENGE for 15% off your entire order from them.
What do you think of today's challenge manicure? Don't forget to check out the InLinkz below to see what Meghan and Lindsey come up with!
04 August 2014
Chevron Skittle Nail Art with KBShimmer
Today's manicure is another simple skittle nail art look - I know, I know. But they're so easy to create and they look amazing! I've just been swamped with real-life projects and I haven't had any prolonged amount of time to spend on doing my nails. But this combo in particular is so cute, you're gonna love it:
To achieve this look, I started with a base of China Glaze At Vase Value on my outer two nails, OPI Alpine Snow on my middle nail, and KBShimmer Eclipse on my ring finger. Then, I topped the outer two nails with KBShimmer Grayscale and made China Glaze At Vase Value chevrons with KBShimmer nail vinyl decals. I topped it all off with KBShimmer Clearly on Top quick dry top coat.
Isn't this color combination too cute? I am a huge fan of throwing in one color with black and white (as you can tell from my last skittle manicure! I only just now realized that I did the same black nail and basic manicure scheme, haha!) This was also my first time using the KBShimmer Grayscale glitter topper, and I'm already in love. Just one coat, and so easy to paint on. The formula isn't thick or anything, but you can easily push around the glitters to wherever you want them. Plus, I love the inclusion of gray glitters!
The nail vinyl decals were fairly easy to use as well, but these particular chevrons were a bit too big for my nail, so they ended up looking like single chevrons. Still, I think they look nice!
Here are the polishes I used.
Some products provided for my honest review.
To achieve this look, I started with a base of China Glaze At Vase Value on my outer two nails, OPI Alpine Snow on my middle nail, and KBShimmer Eclipse on my ring finger. Then, I topped the outer two nails with KBShimmer Grayscale and made China Glaze At Vase Value chevrons with KBShimmer nail vinyl decals. I topped it all off with KBShimmer Clearly on Top quick dry top coat.
Isn't this color combination too cute? I am a huge fan of throwing in one color with black and white (as you can tell from my last skittle manicure! I only just now realized that I did the same black nail and basic manicure scheme, haha!) This was also my first time using the KBShimmer Grayscale glitter topper, and I'm already in love. Just one coat, and so easy to paint on. The formula isn't thick or anything, but you can easily push around the glitters to wherever you want them. Plus, I love the inclusion of gray glitters!
The nail vinyl decals were fairly easy to use as well, but these particular chevrons were a bit too big for my nail, so they ended up looking like single chevrons. Still, I think they look nice!
Here are the polishes I used.
Some products provided for my honest review.
26 July 2014
Sweet Addictions Subscription Box: August Swatches and Nail Art
Hi all, I've got the August Sweet Addictions subscription box to show you today - you'll remember my review of the July box last month - which features two lovely, limited edition polishes and some nail vinyls!
As I mentioned last month, the Sweet Addictions subscription box is curated by the creator of Cupcake Polish, and each month she will be releasing a box that contains two polishes and a limited edition product, and each one will have it's own theme! August's theme is "Circus". Let's take a look at the polishes first:
Topsy Turvy is the contribution from Cupcake Polish, a beautiful turquoise holo filled with a faint gold shimmer. While not exactly circus-y, I find that this polish is just gorgeous! The holographic pigment is especially lovely in the sunlight. Shown above is two coats with top coat.
The other polish in this box is contributed by Philly Loves Lacquer, and it's called Trilby. It's a dark blurple jelly packed to the brim with various glitters, including most prominently large lavender hexes, copper metallic squares, and pink diamonds, as well as a few sparse black stars, and a ton of blue hexes. I love the color combination here! No fishing was required for the application of this polish - quite the contrary actually, as this polish was very glitter packed. I did find that the square glitters experienced curling, so you might want to add a second coat of top coat, or avoid them entirely. Shown above is two coats, with two coats of top coat to smooth out the polish.
*EDIT: I would like to mention that upon removal of this polish, I had some minor staining. The red pigment in this polish stuck onto my nails and left them very pink. It was easily fixed with a good scrub, though!
This box also contains a few sets of nail vinyls from indie brand Love, Angeline - three sheets of diamond star vinyls, and a small sheet of elephant decals. They can be worn on the nail, with top coat, as a sticker, but I chose to use them as stencils for my nail art look:
I started with a base coat of Cult Laguna on all nails except for my ring finger, which was painted with Cult El Porto. Then, I placed the nail vinyls on my nails and painted on El Porto for the diamond stars, and attempted to sponge on a gradient over the elephant decal with Laguna and Cult Los Feliz. I was pleased to find that the vinyls worked with both painting over them, and sponging polish over them, and the edges stayed nice and crisp! I topped this manicure with matte top coat.
Here is a visual of the polishes I used for my nail art look. You can purchase Cult Cosmetics polishes on their website, and use the code "KELLI" at checkout for 15% off your entire order.
Overall, I think the August subscription box is pretty nice - the polishes look great, and the nail vinyls work very well. You can purchase the Sweet Addictions box from the Cupcake Polish shop for $30 USD starting tomorrow, July 27th.
These products will only be available in the subscription box, and there is a limited number of boxes for sale.
Are you thinking of purchasing this one? Which product/polish is your favorite?
These products were provided for my honest review.
As I mentioned last month, the Sweet Addictions subscription box is curated by the creator of Cupcake Polish, and each month she will be releasing a box that contains two polishes and a limited edition product, and each one will have it's own theme! August's theme is "Circus". Let's take a look at the polishes first:
Topsy Turvy is the contribution from Cupcake Polish, a beautiful turquoise holo filled with a faint gold shimmer. While not exactly circus-y, I find that this polish is just gorgeous! The holographic pigment is especially lovely in the sunlight. Shown above is two coats with top coat.
The other polish in this box is contributed by Philly Loves Lacquer, and it's called Trilby. It's a dark blurple jelly packed to the brim with various glitters, including most prominently large lavender hexes, copper metallic squares, and pink diamonds, as well as a few sparse black stars, and a ton of blue hexes. I love the color combination here! No fishing was required for the application of this polish - quite the contrary actually, as this polish was very glitter packed. I did find that the square glitters experienced curling, so you might want to add a second coat of top coat, or avoid them entirely. Shown above is two coats, with two coats of top coat to smooth out the polish.
*EDIT: I would like to mention that upon removal of this polish, I had some minor staining. The red pigment in this polish stuck onto my nails and left them very pink. It was easily fixed with a good scrub, though!
This box also contains a few sets of nail vinyls from indie brand Love, Angeline - three sheets of diamond star vinyls, and a small sheet of elephant decals. They can be worn on the nail, with top coat, as a sticker, but I chose to use them as stencils for my nail art look:
I started with a base coat of Cult Laguna on all nails except for my ring finger, which was painted with Cult El Porto. Then, I placed the nail vinyls on my nails and painted on El Porto for the diamond stars, and attempted to sponge on a gradient over the elephant decal with Laguna and Cult Los Feliz. I was pleased to find that the vinyls worked with both painting over them, and sponging polish over them, and the edges stayed nice and crisp! I topped this manicure with matte top coat.
Here is a visual of the polishes I used for my nail art look. You can purchase Cult Cosmetics polishes on their website, and use the code "KELLI" at checkout for 15% off your entire order.
Overall, I think the August subscription box is pretty nice - the polishes look great, and the nail vinyls work very well. You can purchase the Sweet Addictions box from the Cupcake Polish shop for $30 USD starting tomorrow, July 27th.
These products will only be available in the subscription box, and there is a limited number of boxes for sale.
Are you thinking of purchasing this one? Which product/polish is your favorite?
These products were provided for my honest review.
03 December 2013
Autumn Chevrons with Nail Vinyls
Hi guys! Today I have a simple autumn chevron manicure to show you guys. I don't usually go with this kind of color scheme, but I like the way these polishes look together!
I used OPI What Wizardry Is This, a molten brown textured polish, and Julep Lisa, which usually looks gray to me, but paired with this color, it almost looks green. To make the chevrons, I used Nail Vinyls. They make chevrons super easy!
So what do you think of this color combination?
I used OPI What Wizardry Is This, a molten brown textured polish, and Julep Lisa, which usually looks gray to me, but paired with this color, it almost looks green. To make the chevrons, I used Nail Vinyls. They make chevrons super easy!
So what do you think of this color combination?
19 November 2013
Chevron Skittle Nail Art With Nail Vinyls
Hey guys! Today I have a simple skittle manicure to show you that I created using Nail Vinyls, which are convenient stickers for those of us who don't have chevron scissors (and trust me, those are difficult to find!) These vinyls are really easy to use (and they come with instructions if you aren't sure.)
I started with a base of Zoya Dove, OPI My Boyfriend Scales Walls, and OPI Get Your Number, which is a gorgeous blue Liquid Sand shade from last year's winter collection - look at all of that holographic glitter in the bottle! I used OPI Suzi Says Feng Shui for the chevrons. The neon blue studs are from Born Pretty Store (use the code RFL91 for 10% off your order!)
I think these nail vinyls are easy and convenient - one of my biggest problems with using chevron scissors is keeping all the chevrons the same width, so this eliminated that problem entirely.
They sell for $3 for a sheet of 100 stickers (free shipping!) and you can get them from the Nail Vinyls website here. You can also find them on Instagram at @teismom, where you can get news and updates, and some photos of customers using the nail vinyls!
What do you think of this product?
*This product was provided by the manufacturer for my honest review.
I started with a base of Zoya Dove, OPI My Boyfriend Scales Walls, and OPI Get Your Number, which is a gorgeous blue Liquid Sand shade from last year's winter collection - look at all of that holographic glitter in the bottle! I used OPI Suzi Says Feng Shui for the chevrons. The neon blue studs are from Born Pretty Store (use the code RFL91 for 10% off your order!)
I think these nail vinyls are easy and convenient - one of my biggest problems with using chevron scissors is keeping all the chevrons the same width, so this eliminated that problem entirely.
They sell for $3 for a sheet of 100 stickers (free shipping!) and you can get them from the Nail Vinyls website here. You can also find them on Instagram at @teismom, where you can get news and updates, and some photos of customers using the nail vinyls!
What do you think of this product?
*This product was provided by the manufacturer for my honest review.